New GLDAB by Arduino Pro mini 12/October/2023
05/May/2024 up
Arduinoを使った滑空装置の製作
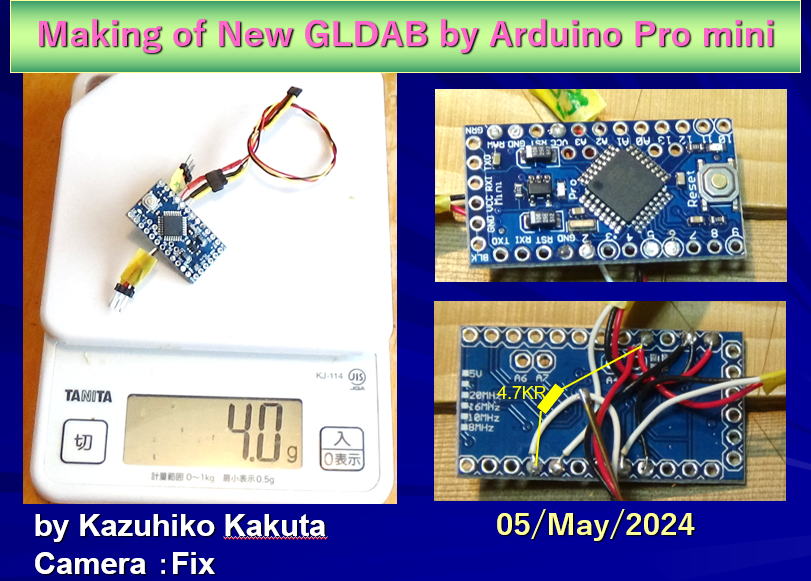
Making of New GLDAB by Arduino Pro mini 4g
Arduino CODE on GitHub
New GLDAB by Arduino Pro mini : gliding device using Arduino
https://github.com/KazuKaku/NewGLDAB-by-Arduino
YouTube Video https://youtu.be/KpQxz6biprs
Arduino CODE ZipFile
(保存するとウイルスチェックが入ります-安全なファイルです)
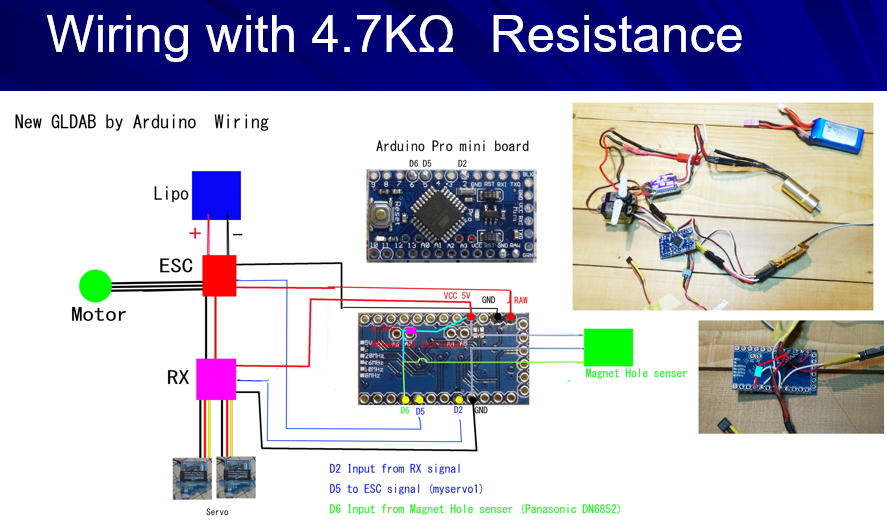
羽ばたき機を滑空させるため、磁石センサーを使って、翼を滑空位置に停止させる装置(New GLDAB)をArduino pro mini boardを使って製作。
Arduino pro mini にCODEを書き込む。
In order to make the Ornithopter glide, I created a device (New GLDAB) that uses a magnetic sensor to stop the wings in the gliding position using an Arduino pro mini board.
Write CODE to Arduino pro mini.
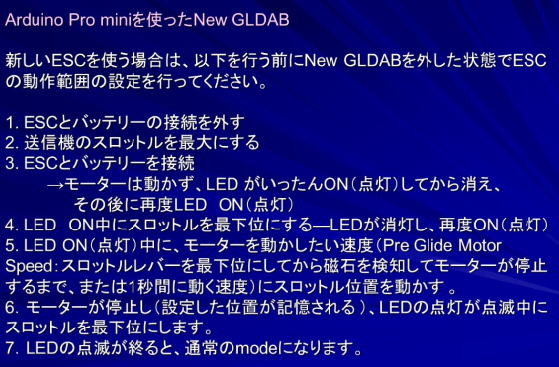
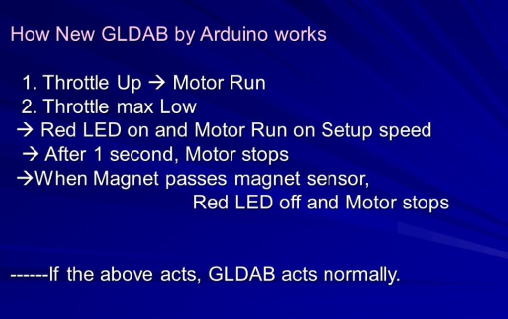
Arduino Pro miniを使ったNew GLDAB 新しいESCを使う場合は、以下を行う前にNew GLDABを外した状態でESCの動作範囲の設定を行ってください。 1. ESCとバッテリーの接続を外す 2. 送信機のスロットルを最大にする 3. ESCとバッテリーを接続 →モーターは動かず、LED がいったんON(点灯)してから消え、 その後に再度LED ON(点灯) 4. LED ON中にスロットルを最下位にする—LEDが消灯し、再度ON(点灯) 5. LED ON(点灯)中に、モーターを動かしたい速度(Pre Glide Motor Speed:スロットルレバーを最下位にしてから磁石を検知してモーターが停止するまで、または1秒間に動く速度)にスロットル位置を動かす 。 6.モーターが停止し(設定した位置が記憶される )、LEDの点灯が点滅中にスロットルを最下位にします。 7.LEDの点滅が終ると、通常のmodeになります。
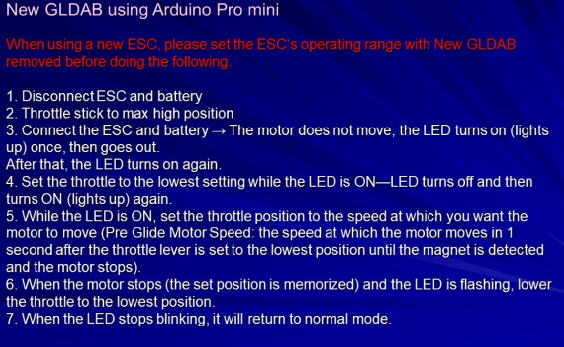
New GLDAB using Arduino Pro mini When using a new ESC, please set the ESC‘s operating range with New GLDAB removed before doing the following. 1. Disconnect ESC and battery 2. Throttle stick to max high position 3. Connect the ESC and battery → The motor does not move, the LED turns on (lights up) once, then goes out. After that, the LED turns on again. 4. Set the throttle to the lowest setting while the LED is ON—LED turns off and then turns ON (lights up) again. 5. While the LED is ON, set the throttle position to the speed at which you want the motor to move (Pre Glide Motor Speed: the speed at which the motor moves in 1 second after the throttle lever is set to the lowest position until the magnet is detected and the motor stops). 6. When the motor stops (the set position is memorized) and the LED is flashing, lower the throttle to the lowest position. 7. When the LED stops blinking, it will return to normal mode.
Magnetセンサーは敏感なので、手で触ると磁場を検知してしまう。
また、磁場検知の試験を行うときに、木の板の上では、正確に動作しない。発泡ポリプロピレンなどの上で行うと良好に反応する。
The magnet sensor is sensitive, so if you touch it with your hand, it will detect a magnetic field.
Also, when testing magnetic field detection, it does not work correctly on a wooden board. It reacts well when carried out on foamed polypropylene, etc.

2024/11/14
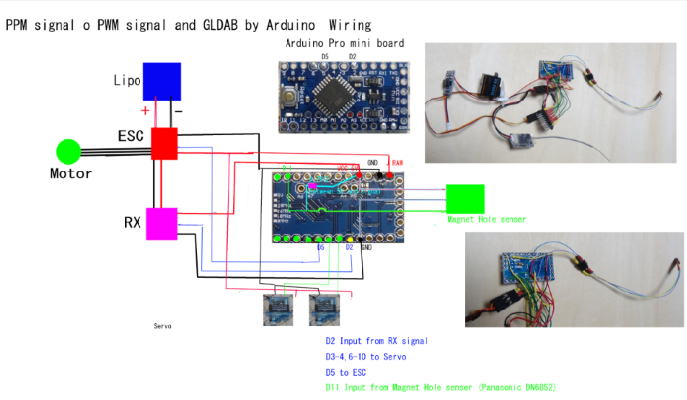
New GLDAB by Arduino using ppm-outputRX(ppm to PWM output)
New GLDAB by ArduinoにRXからのppm信号を受けて
PWM信号に出力できるように改造
これにより大きなRXを使わなくても1gの小さな受信機を使用できる。
PWM出力8ch
New GLDAB by Arduino modified to receive ppm signal from RX and output PWM signal.
This allows you to use a small 1g receiver without using a large RX.
PWM output 8ch
Youtube--Making of Convert PPM signal to PWM and GLDAB for Gliding by Arduino board (Arduino pro mini)
https://www.youtube.com/watch?v=hw5doqiESM8
Zip File (保存するとウイルスチェックが入ります-安全なファイルです)
New Arduino GLDAB with converting ppm signal to PWM signal (8ch)
sketch_241109ppmtopwmRXwithGLDAB
Only converting ppm signal to PWM signal (8ch) no GLDAB
sketch_241110PPMtoPWM8ch_2