------------------------Go to Japanese Page
GLDAB New Program for Gliding of Ornithopter
I changed a program of GLDAB as follows:
1. When throttle is moved to low position, motor works by the set output.
When magnetic force is detected, a motor stops.
2. The time when a motor works by the set output is one seconds.
GLDAB is very good device for Gliding of Ornithopter. Total weight(GLDAB+Magnet+Sensor) is only 5-6g, and is very simlpe setting & structure.
Please look for more detail : http://ovirc.free.fr/GLDAB.php
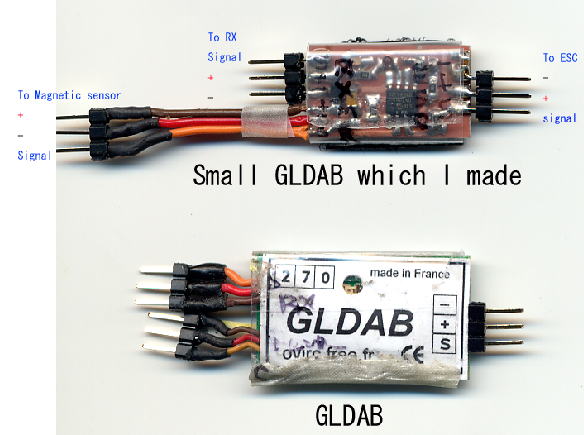
Now, on the basis of GLDAB, I make a base and I collect parts and produce small GLDAB.
This small GLDAB can be carried small ornithopter.
GLDAB_1200.asm
GLD_Pulse_1200.asm
My_Math16.asm
GLDAB_1200.HEX
New Programed GLDAB
http://ovirc.free.fr/GLDAB.php
http://kakutaclinic.life.coocan.jp/GLDAB.htm
PURPOSE 目的
The GLDAB unit is intended for positioning the wings of an RC ornithopter into the gliding position.
GLDABは、羽ばたき機の翼を滑空するために停止位置を設定する装置です。
It works in conjunction with a mechanical ratchet.
GLDABは羽ばたき機のつめ車装置(ラチェット:歯止め)と共同して機能を発揮します。
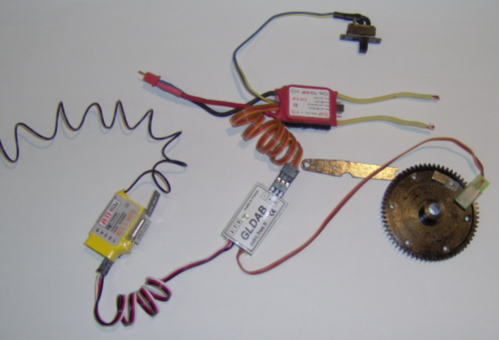
IMPLEMENTATION (see picture) 実施(図を参照)
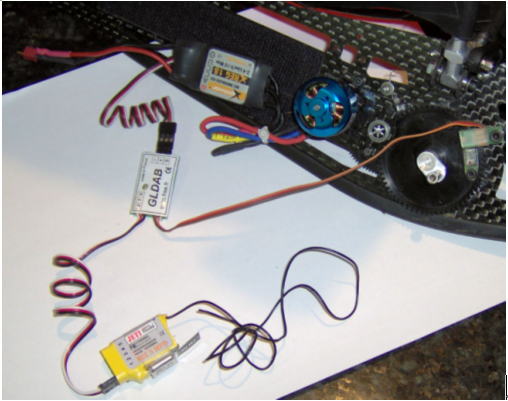
The unit should be inserted between the RX and the ESC.
GLDABは、受信機とスピードコントローラーの間に接続します。
The magnetic detector connected to the unit is used to detect the stop position.
GLDAB装置に接続された磁石感知装置は、停止位置を決定するために使われます。
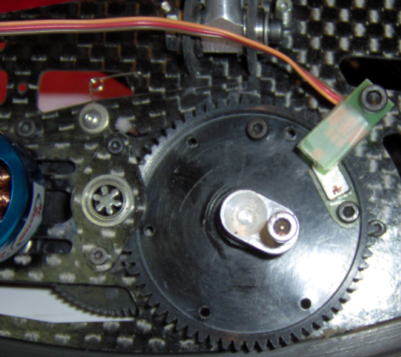
The magnet should be fixed onto the main gear of the mechanism.
磁石は、羽ばたき装置の主ギアに固定されます。
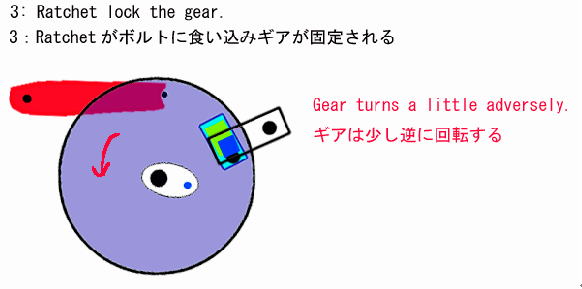
The magnetic detector and the magnet should be aligned when the mechanical ratchet is engaged.
磁石感知装置と磁石は、歯止めが働いている場合に、効果を発揮します。
 固定された状態
At first hang a ratchet on a screw of a gear and fix wings at a gliding
position (see figure).
まず、歯止めをギアのビスに引っかけ、翼が滑空位置に固定された状態にします。
At this position, install a magnet detector and a magnet like a figure.
この位置で、図のように磁石感知装置と磁石を設置します。
The top of the detector (component side) should be mounted facing the magnet!
磁石感知装置の表面(素子側)が磁石と面するように装着します。
Please regulate height so that the distance between the detector and the magnet become short as possible.
磁石感知装置と磁石の間の距離がなるべく短くなるように高さを調節します。
Equipment connection 装置の接続
OPERATION (enter glide sequence)
操作(滑空状態にする)
At first you let your Ornithopter fly at low speed as much as possible.
まず、できる限り低速で羽ばたき飛行をします。
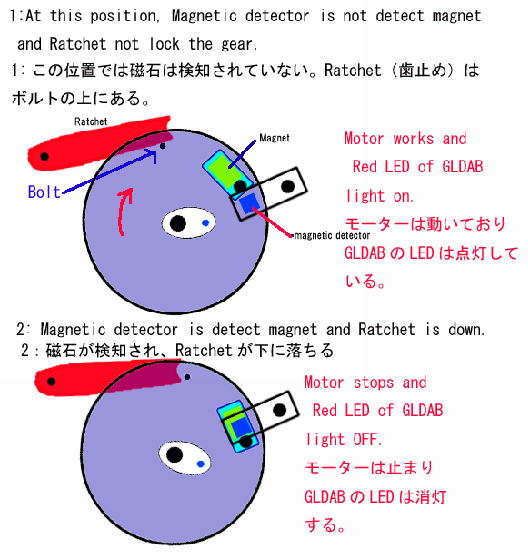
When gliding is ordered (throttle low), during one second, the motor works at a pre-selected low speed and stops when the magnet is detected, ensuring that the mechanical ratchet mechanism will engage and lock the wings.
滑空するように操作する(スロットルを下げる)と、モーターは、あらかじめ設定された低速で動き、磁石が感知されると停止します。そして、歯止めを働かせ、翼を固定します。
If the magnet still is not detected after 1 seconds, the motor shuts off.
もし、1秒間、磁石が感知されない場合は、モーターは停止します。
When the throttle is raised again, the glide sequence terminates and normal throttle control is restored.
再度スロットルをあげると、滑空状態は終了し、通常のスロットルコントロールができるようになります。
RC-SETUP/STARTING UP
ラジコン装置のセットアップとスタートアップ
Set-up mode allows you to change the motor speed setting used
to move the wings downward to the “locked” position.
セットアップモード:翼を固定する位置まで翼を動かすためのモーターのスピードの設定
-->To enter set-up mode, set the throttle to "full" for 2
seconds, right after connecting the battery or turning on the RC system.
LED blinking.
セットアップモードに入るためには、スロットルスティックを最上位にし、送信機の電源を入れ、モーターコントロール装置に電源をつなぎ(電源スイッチを入れ)、2秒間維持します。発光ダイオードが点滅します。
-->Move throttle to "off" position for 2 seconds. LED ON.
スロットルスティックを最下位にして2秒間維持します。発光ダイオードが点灯します。
-->Move throttle to the desired motor speed setting. The LED will blink
for 4 seconds.
スロットルスティックを設定したい位置に移動させます。発光ダイオードが4秒間点滅します。
-->The selected motor speed is memorized at the end of these 4 seconds. This
position becomes the most low velocity position in normal motor control
(a motor rotation start at this position).
4秒後、この位置が記憶されモータースピードが設定されます。
この位置が、通常のモーターコントロール時の最低速位置(モーター回転開始位置)になります。
Warning: If the selected speed is too low, the wings do not move to lock position, so, the wings will not lock. And your model will be put in jeopardy.
注意: もし設定したモータースピードが低速すぎると、翼は固定位置まで動かず、翼は固定されません。あなたの羽ばたき機は危険な状態になります。
Normal start-up is performed with throttle set to "off" position. The LED is ON for 2 seconds right after power on.
正常なスタートアップ: 正常なスタートアップはスロットルスティックが"切りoff:スティック位置最下位)の状態で行われます。
Summary
1. Disconnect between ESC and battery
2. Throttle up at max high position
3. Connect between ESC and battery -> Motor not run and LED on
4. Wait more than 2 seconds -> LED off
5. Throttle down at max low position -> LED on
6. Wait more than 2 seconds -> Motor Run slow speed and LED repeat on-off
for 4 seconds ->Set throttle position at that you wish for runnig motor
speed while LED flashes on and off (It is usually OK at the lowest throttle
position). When on and off of LED is end and Motor stops, Set position
is memorized.
Set is End.
Verify
1. ThrottleUp -> Motor Run
2. Throttle max Low ->Red LED on and Motor Run on Setup speed
After 1 second, Motor stops.
3. When Magnet passes magnet sensor->Red LED off and Motor stops
4. When Magnet sensor contact Magnet,
Motor stops at Max low Position of
Throttle.
HINTS ヒント
In order to achieve a successful glide lock, it is necessary to tune
your controller/ESC accordingly.
滑空できるための翼の固定を達成するためには、あなたのスピードコントローラーの調整が必要です。
Speed in a gliding start, the strength of wind, a voltage fall of battery influence a position of a stop of a gear.
ギアの停止位置は、滑空開始時の速度、風の強さ、バッテリーの電圧低下などが影響します。
If the wings not lock, try to setup
“selected
low motor speed” higher.
もし、翼が固定されない場合は、モーター速度の設定を現在より高回転にセットしてみてください。
If in flight, the setuped low speed of the
motor is too weak, then it is necessary to reprogram to stronger
torque.
つまり、飛行中、モーター回転が低速で、力が弱い場合は、より高速の位置(回転力が強い)にセットしてください。
The GLDAB can be programmed
for all the motors (brushed or brushless), for
various wings, for more or less wind
GLDABはどんなモーターでも(ブラシモーターでもブラシレスモーターでも)、どんな羽でも、風が強くても弱くてもプログラムすることができます。
Caution:
(2010/5/9 postscript)
In the state that the battery voltage is falling, if you move a throttle
to max low to let GLDAB act, the voltage of battery may suddenly falls.
So, ESC may recognizes low voltage, and a motor has stopped.
In this state, wing does not move to a locked position for gliding, and your ornithopter is to fall.
When the battery voltage fell, do not operate GLDAB.
I suggest to let you land your ornithopter in flapping.
注意:(2010/5/9追記) バッテリー電圧が低下しつつある状態でスロットルを下げてGLDABを働かせると、急激に電圧が低下し、ESCが低電圧を認識しモーターが停止してしまうことがあります。この状態では滑空状態にロックされる位置まで翼を動かせず、墜落することになります。バッテリー電圧が低下してきた場合は、GLDABを動かさず、羽ばたきながら着陸させることをお奨めします。
Please
look this Video.
Making and Setting of New GLDAB
https://www.youtube.com/playlist?list=PLErvdRrwWuPphMhJV_JXeWjlKxJiv5GAF
http://fr.youtube.com/watch?v=OQFEh4jv2SI